Tuesday 5 December 2023

Edit, add, or remove ports of an existing Docker container

In some cases you need to assign additional ports to a running Docker container, or change the ports in use. This is completely possible without creating a new docker image or re-running docker run to create a new container. To change the ports of a running Docker Container, follow the instructions below.

Example: we have a container of image php:8.1-apache configured with port mapping 8080->80/tcp. We will edit this container to open port 8081->443/tcp.

Warning! You should back up before editing any files

Step 1: Go to your container configuration directory

Go to the directory where the containers are stored

cd /var/lib/docker/containers

Here you will see folders with names corresponding to container ids. Then access the directory of the corresponding container you need to edit.

The full path will be as follows

/var/lib/docker/containers/your_container_id_hash

You can find the container's hash id via the command

docker ps -a

Step 2: Stop docker service (docker.socket)

systemctl stop docker.socket

Step 3: Edit expose ports config in file config.v2.json

We will declare port 443 on the container

Find json string 

"ExposedPorts":{"80/tcp":{}}

Then add new port

"ExposedPorts":{"80/tcp":{},"443/tcp":{}}

Step 4: Edit ports mapping config in file hostconfig.json

We will map port 8081 on the host computer to the newly created port 443/tcp on the container

Find json string 

"PortBindings":{"80/tcp":[{"HostIp":"","HostPort":"8080"}]}

Then add new port

"PortBindings":{"443/tcp":[{"HostIp":"","HostPort":"8081"}],"80/tcp":[{"HostIp":"","HostPort":"8080"}]}

Step 5: Restart the docker service

systemctl start docker

Done !

Sunday 12 February 2023

PHP - Access ChatGPT API using cURL

To access OpenAI's ChatGPT API using PHP, you can use any HTTP client library that supports making HTTP requests with JSON payloads, such as Guzzle or cURL. You may find it a bit ridiculous, because ChatGPT hasn't officially announced the API yet. But the fact that OpenAI already has APIs available to provide full task processing like ChatGPT. This REST API can answer your questions or handle your requests with the same results as ChatGPT.

How GPT Chat Works

As a general-purpose language model, ChatGPT is likely to use a combination of OpenAI's available models and techniques to generate its responses, depending on the context and nature of the question. Additionally, OpenAI may update or modify its models over time, so the specific models used by ChatGPT may change as well. In other words, if you use the OpenAI API with the right Model, you can get the same results as ChatGPT. Of course ChatGPT will have more features and especially the ability to link topics with your messages.

How to access OpenAI ChatGPT API using Curl

You can study the documents and examples at the following links:

OpenAI Docs: https://platform.openai.com/docs/introduction
Models: https://platform.openai.com/docs/models/gpt-3
Features and examples: https://platform.openai.com/examples
Get API Key: https://platform.openai.com/account/api-keys

ChatGPT API Sample:

<?php
$data = array(
  "prompt" => "Is Climate Change worrisome?", //Your question or request
  "temperature" => 0.5,
  "max_tokens" => 500
);

$ch = curl_init();
curl_setopt($ch, CURLOPT_URL, 'https://api.openai.com/v1/engines/davinci-codex/completions');
curl_setopt($ch, CURLOPT_RETURNTRANSFER, 1);
curl_setopt($ch, CURLOPT_POST, 1);
curl_setopt($ch, CURLOPT_POSTFIELDS, json_encode($data));

$headers = array();
$headers[] = 'Content-Type: application/json';
$headers[] = 'Authorization: Bearer YOUR_API_KEY';
curl_setopt($ch, CURLOPT_HTTPHEADER, $headers);

$response = curl_exec($ch);
if (curl_errno($ch)) {
    echo 'Error:' . curl_error($ch);
}
curl_close($ch);
echo $response;
/**
 * Output Response :
 * Yes, climate change is dangerous and has significant consequences
 * for the planet and its inhabitants. The warming of the Earth's climate
 * due to increased greenhouse gas emissions, primarily from human
 * activities such as burning fossil fuels, is causing more frequent
 * and severe natural disasters, such as floods, heatwaves, wildfires, and storms.
 * */

Note:

- Unlike ChatGPT, OpenAI API is not free but charges based on the number of input and output characters each of your APIs

- A programmer can use OpenAI's API to integrate various natural language processing capabilities into their applications, such as text generation, question answering, language translation, sentiment analysis, and more. With the API, You can leverage the power of OpenAI's advanced machine learning models and algorithms without having to build them from scratch. However, note that OpenAI has some usage restrictions for their API, so make sure to review their documentation before integrating it into your project.


Friday 10 February 2023

How to fix error "system is deadlocked on memory" on Vultr VPS

The error "system is deadlocked on memory" "end Kernel panic - not syncing" usually indicates that the system has run out of available memory and processes are unable to allocate additional memory. This error comes from the VPS kernel, so it can be encountered in both Linux or Windows VPS operating systems. To resolve the issue on your Vultr VPS or any other service provider (Linode, Digitalocean ...) you can try the following steps:

Note: The first thing you need to do when you encounter this error is to quickly backup or snapshot VPS. Because the wrong operations at this time can cause you to lose the data in your VPS. 

Case 1 : Error on startup (can not start VPS)

  1. Restart the server: If the issue persists, you can restart your Vultr VPS to clear the memory and resolve the deadlock.

  2. Turn off the startup scripts with VPS (in VPS management) that you added (if exist)

  3. Upgrading to a VPS droplet with more memory: If other solutions don't work, upgrading to a more configurable VPS plan might solve the situation. Upgrading VPS to a higher droplet at Vultr is easy, safe and does not affect your data or applications.

  4. Contact Vultr for support: The last resort or if you are too worried about the current data in the VPS. Experts from Vultr will be able to help you fix the problem

Case 2: Error during operation (sometimes encounter)

  1. Monitor resource usage: Use the 'top',' htop' command or "Task Manager' to monitor the resource usage of your system. Identify the processes that are consuming large amounts of memory and determine if they can be terminated or if their resource usage can be optimized.

  2. Kill processes: If a specific process is consuming a large amount of memory and is not responding, terminate it.

  3. Increase swap space(Linux): If your system does not have enough physical memory, you can increase the amount of swap space to temporarily address the issue.

  4. Optimize application performance: If the issue recurs frequently, you may need to optimize the performance of your applications

It's important to monitor your system and its resource usage to identify and resolve issues before they become severe. Consider using a system monitoring tool to automatically alert you to any issues.

Monday 7 November 2022

PHP Convert Hex String to String

How to decode Hex String to String?

Ex: Decode Hex String to get JWT token when integrating Apple ID login


Solved

Hex string is a data type commonly used for transmission over the internet in the lower network layers. In some cases PHP will need to manipulate this data type directly. To handle them, PHP provides us with the "pack" function to manipulate Hex and binary string data.

Ex:


$stringHexData = "65794a68624763694f694a49557a49314e694973496e523563434936496b705856434a392e65794a7063334d694f694a6f64485277637a6f764c3246776347786c61575175595842776247557559323974496977695958566b496a6f69593239744c6e4e68625842735a533568634841694c434a6c654841694f6a45324d5459354f4455794e6a4973496d6c68644349364d5459784e4449314d444d334d69776963335669496a6f694d4441774e7a677a4c6d4e6b5a6a45354d47526b4d544130595452685a6a42694e6d49774e6a63784d3249344d4455304d6a52694c6a45304d5451694c434a6a58326868633267694f694a7852557035546d7473556d4a5a626c46565679316b646d6774536b7452496977695a573168615777694f694a7a59573177624756415a3231686157777559323974496977695a57316861577866646d567961575a705a5751694f694a30636e566c4969776959585630614639306157316c496a6f784e6a45324f5441774d7a63794c434a756232356a5a56397a6458427762334a305a5751694f6e527964575573496e4a6c5957786664584e6c636c397a6447463064584d694f6a4a392e764b6c394873303057587463426851796f47326742766a744375394d5878787471674e46777854772d5034";

$stringData = pack("H*",$stringHexData);

echo $stringData;

Result (JWT String): 


eyJhbGciOiJIUzI1NiIsInR5cCI6IkpXVCJ9.eyJpc3MiOiJodHRwczovL2FwcGxlaWQuYXBwbGUuY29tIiwiYXVkIjoiY29tLnNhbXBsZS5hcHAiLCJleHAiOjE2MTY5ODUyNjIsImlhdCI6MTYxNDI1MDM3Miwic3ViIjoiMDAwNzgzLmNkZjE5MGRkMTA0YTRhZjBiNmIwNjcxM2I4MDU0MjRiLjE0MTQiLCJjX2hhc2giOiJxRUp5TmtsUmJZblFVVy1kdmgtSktRIiwiZW1haWwiOiJzYW1wbGVAZ21haWwuY29tIiwiZW1haWxfdmVyaWZpZWQiOiJ0cnVlIiwiYXV0aF90aW1lIjoxNjE2OTAwMzcyLCJub25jZV9zdXBwb3J0ZWQiOnRydWUsInJlYWxfdXNlcl9zdGF0dXMiOjJ9.vKl9Hs00WXtcBhQyoG2gBvjtCu9MXxxtqgNFwxTw-P4

More 

In addition, the "pack" function also supports other data types. 


possible values of format are:
a – string which is NUL-padded
A – string which is SPACE-padded
h – low nibble first Hex string
H – high nibble first Hex string
c – signed character
C – unsigned character
s – signed short (16 bit, machine byte order)
S – unsigned short ( 16 bit, machine byte order)
n – unsigned short ( 16 bit, big endian byte order)
v – unsigned short ( 16 bit, little endian byte order)
i – signed integer (machine dependent byte order and size)
I – unsigned integer (machine dependent byte order and size)
l – signed long ( 32 bit, machine byte order)
L – unsigned long ( 32 bit, machine byte order)
N – unsigned long ( 32 bit, big endian byte order)
V – unsigned long ( 32 bit, little endian byte order)
f – float (machine dependent representation and size)
d – double (machine dependent representation and size)
x – NUL byte
X – Back up one byte
Z – string which is NUL-padded
@ – NUL-fill to absolute position

Saturday 5 November 2022

Android - Replace OnLifecycleEvent is deprecated with DefaultLifecycleObserver or LifecycleEventObserver

As of androidx.lifecycle version 2.4.0, OnLifecycleEvent is deprecated. Instead Use DefaultLifecycleObserver or LifecycleEventObserver is recommended to use instead. Many android applications that use OnLifecycleEvent such as when integrating Admob Open Ads will receive a warning.


For example, the following code will be warned by Android Studio OnLifecycleEvent is deprecated:


    /**
     * LifecycleObserver methods
     */
    @OnLifecycleEvent(ON_START)
    public void onStart() {
        showAdIfAvailable();
        Log.d(LOG_TAG, "onStart");
    }
To replace OnLifecycleEvent, follow these instructions:

First: In build.gradle, please include the LifecycleObserver libraries:


apply plugin: 'com.android.application'

dependencies {
   ...

   implementation "androidx.lifecycle:lifecycle-extensions:2.2.0"
   implementation "androidx.lifecycle:lifecycle-runtime:2.5.1"
   annotationProcessor "androidx.lifecycle:lifecycle-compiler:2.2.0"
}

Then choose one of the following two alternatives:

Method 1: replace OnLifecycleEvent with DefaultLifecycleObserver


...
import androidx.lifecycle.DefaultLifecycleObserver;

public class MyApplication extends Application implements DefaultLifecycleObserver {
    @Override
    public void onCreate() {
        super.onCreate();
	// Register DefaultLifecycleObserver 
	ProcessLifecycleOwner.get().getLifecycle().addObserver(this);
    }

    /*Replace for OnLifecycleEvent onStart Event */
    @Override
    public void onStart(@NonNull LifecycleOwner owner) {
	// Perform actions every time the app is reopened
    }
}

Method 2: replace OnLifecycleEvent with LifecycleEventObserver


public class MyApplication extends Application implements LifecycleObserver
{
  @Override
  public void onCreate() {
    super.onCreate();
    //...
    // Register LifecycleObserver
    ProcessLifecycleOwner.get().getLifecycle().addObserver(this);
    //...
  }

  /*Replace for OnLifecycleEvent onStart Event */
  @OnLifecycleEvent(Event.ON_START)
  protected void onMoveToForeground() {
    // Perform actions every time the app is reopened (moves to foreground)
    // appOpenAdManager.showAdIfAvailable(currentActivity);
  }
}

Done !

If you have any difficulties, or have any questions, please leave a comment below the article. We will deal with them together. Thanks


Friday 21 October 2022

Flutter Dart Error: Can't load Kernel binary - Invalid kernel binary

During working with Flutter, Error "Can't load Kernel binary" may arise unexpectedly after we make some changes to the application. This error is often confusing for developers because it often does not specify a clear cause. Even if you haven't done anything wrong, mistakes can still appear spontaneously. With luck, cleaning the project can fix this problem, but in many cases it doesn't work.

Example of an error message:

[ERROR:flutter/shell/common/shell.cc(197)] Dart Error: Can't load Kernel binary: Invalid kernel binary: Indicated size is invalid.
   .../runtime/runtime_controller.cc(385)] Could not create root isolate
   ./android/android_shell_holder.cc(138)] Could not launch engine in configuration.
  

Reason:

Android Studio's compiler sometimes doesn't work as expected, so the process of linking libraries to compile Dart source code may encounter errors that distort the project's configuration paths. This results in errors during or after compilation with cryptic errors, even errors reported that seem absurd, unrelated to the problem. (It appears to be similar to the bug in Android Studio's Dart code suggestion function. In many cases Android Studio suggests inserting const or required keywords but inserts these keywords in the wrong place. which it is suggested.).
Once errors of this type arise, it is often cached in the project, so many times we try to find ways to not handle the error, but sometimes it suddenly disappears and cannot be re-appeared.

"Dart Error: Can't load Kernel binary: Invalid kernel binary: Indicated size is invalid."

Solve it

Please try the following steps one by one until the problem is resolved

Step 1: Clear project cache
Completely close the application in the virtual machine.
In the main project directory, run the command: "flutter clean"
Then run "flutter pub get" again to update the libraries. 
Rebuild the project to see if the error has been resolved, You can also try to change a little bit in the application's code to make sure the application has been rebuilt and not loaded from the cache. If the problem is not resolved, try step 2

Step 2: Clear Flutter SDK Cache
Go and delete all files in the cache folder of Flutter SDK.
"...flutter/bin/cache"
As required when installing, the Flutter SDK is usually installed in the C drive. For example: C:/flutter
You can also easily find the path to the Flutter SDK in the ".flutter-plugins" file inside your project.
After clearing the cache, run the "flutter doctor" command again to let flutter update the libraries (you can run "flutter doctor" from anywhere).
Re-open Project to see if the problem has been resolved. If not, continue with step 3.

Step 3: Rollback of previous project changes
Try reversing some of the last changes you made to the project's source code. (Remember to save those changes because you can still use them normally if they're not wrong.) Reversing changes, creating changes in the project's source code can help clear caches and miscompiled configuration fragments.
If the error is still not resolved when you have reversed the small segments then try some higher level change in the file "main.dart"

Note: In the process of fixing errors, you should not use "hot restart"

If there is anything more to share in this situation, please leave information in the comment section so we can discuss.

Tuesday 30 August 2022

MariaDB/MySQL - Fix error "Unknown/unsupported storage engine: InnoDB" by using recover mode

Although the InnoDB storage engine has mechanisms to preserve data, problems such as power failure or sudden restart can still cause errors in MySQL/MariaDB data. These errors can make the system unable to boot, unable to restore the normal data state. Some of the error messages we often encounter are listed below.


[Note] InnoDB: Starting shutdown...
[ERROR] InnoDB: Database was not shut down normally!
[ERROR] Plugin 'InnoDB' init function returned error.
[ERROR] Plugin 'InnoDB' registration as a STORAGE ENGINE failed.
[Note] Plugin 'FEEDBACK' is disabled.
[ERROR] InnoDB: Starting crash recovery from checkpoint LSN=1637690
[ERROR] Unknown/unsupported storage engine: InnoDB
[ERROR] Aborting


Note: Some crashes are caused by other causes but also return the error message "Unknown/unsupported storage engine: InnoDB". In that case, there will be more detailed information in the MySQL log to help you find the cause and handle it. As for the cases where the service can't tell why InnoDB is unsupported or unrecoverable, most of the time, data errors are caused. You can handle that case according to the instructions in this article.

To use this mode is very simple. You just need to specify the value innodb_force_recovery in the installation file of MySQL or MariaDB. Then restart the service. MySQL will restart and try to use recovery mode to recover the corrupted data.


[mysqld]
innodb_force_recovery = 1

MySQL has a total of 6 recovery modes in ascending severity. You often choose to get the most suitable mode for your system. Please try again with a higher level if the error is not resolved.


1 (SRV_FORCE_IGNORE_CORRUPT)
Lets the server run even if it detects a corrupt page. Tries to make SELECT * FROM tbl_name jump over corrupt index records and pages, which helps in dumping tables.

2 (SRV_FORCE_NO_BACKGROUND)
Prevents the master thread and any purge threads from running. If an unexpected exit would occur during the purge operation, this recovery value prevents it.

3 (SRV_FORCE_NO_TRX_UNDO)
Does not run transaction rollbacks after crash recovery.

4 (SRV_FORCE_NO_IBUF_MERGE)
Prevents insert buffer merge operations. If they would cause a crash, does not do them. Does not calculate table statistics. This value can permanently corrupt data files. After using this value, be prepared to drop and recreate all secondary indexes. Sets InnoDB to read-only.

5 (SRV_FORCE_NO_UNDO_LOG_SCAN)
Does not look at undo logs when starting the database: InnoDB treats even incomplete transactions as committed. This value can permanently corrupt data files. Sets InnoDB to read-only.

6 (SRV_FORCE_NO_LOG_REDO)
Does not do the redo log roll-forward in connection with recovery. This value can permanently corrupt data files. Leaves database pages in an obsolete state, which in turn may introduce more corruption into B-trees and other database structures. Sets InnoDB to read-only.

Finally, after troubleshooting, restore the "innodb_force_recovery" configuration to level 0 and then restart the database service to keep the system working properly.

Also note that this is only a workaround, it may also fail if the data is badly corrupted. Our advice remains that every database system should always have a mechanism to automatically back up data.


Sunday 21 August 2022

[Flutter] Async Function vs Normal Function in Dart, How do they work?

 "Synchronous", "asynchronous", "await" and "asynchronous functions" are very confusing concepts when used in Flutter. For ease of explanation, in this article we will analyze two types of Flutter functions: Normal Function and Async Function. We will learn how these two types of functions work.

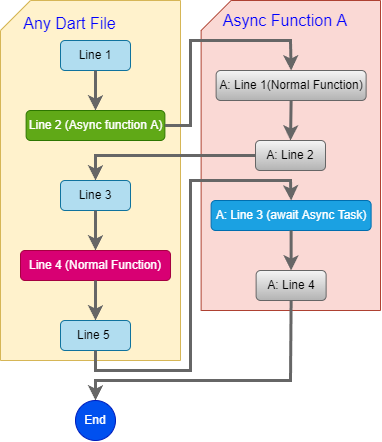
Ficture 1: Flutter/Dart async work flow

Normal Function and Async Function

The Dart language that Flutter uses inherits many features from Javascript. Dart's handling of synchronous and asynchronous jobs is also very similar to Javascript. There are two types of functions in the Dart language:

* Normal Function:

A function in Dart is declared as follows:


String doSomthing(){
    print('This is a normal Function');
    // do somthing
    return 'Done!';
}

* Async Function:

Async functions are functions declared with the async keyword at the end. 


String getApiContent() async{
    print('Async function loading api from Server');
    final response = await http.get(Uri.parse('https://codesiri.com/search/?q=api'));
    return response.body;
}
The difference of Async functions from normal functions is that in an Async function you will be able to use the await keyword to wait for another function to finish executing. Also, an Async doesn't return an immediate result, it just returns a Future.

Dart is an asynchronous language

By default, Dart always tries to process everything asynchronously whether it is an async function or a normal function. Let's analyze the example depicted in Figure 1.

Like other programming languages, DArt will also process the source code line by line from top to bottom. Even when encountering an Async function it continues to deal with the same logic. That's why in the example we see line 1 and line 2 in asyn function callApi still being executed. "Async" appears only when an actual async event occurs (http.get).

Inside an Async function when encountering a "real" async event (a predefined async event by Dart, not a self-created async function) there are 2 options.

Case 1: you can use the await keyword to wait until the async event completes and return the result. The current async function will break at that location. You did not read it wrong, Exactly, the async function will be interrupted at that point, not a new thread or process is initialized to run in the background at this time to continue the async task we are expecting. (You can use additional tools like Charles to verify this.) Of course Dart has kept in mind that there is an Async event still pending. Next Dart will return to the main program to continue to execute the next lines of code. That's why we see the sleep function being executed immediately followed by lines 3, 4, 5 being executed. After the main program has completed, Dart returns to continue processing asynchronous events and the next line of code in the async function.

Case 2: if you don't use await keyword before async event. Just like the case of 1 Dart will remember the pending asynchronous event, but next Dart will continue to execute the next code in the current async function as if nothing happened.


import 'package:http/http.dart' as http;
import 'dart:io';

void main(){	
  print('Line 1 - done !');
  var apiResult = callApi();
  sleep(Duration(seconds: 15)); // Test to monitor async task
  print('Line 3 - done !');
  normalFunction();
  print('Line 5 - done !');
}

Future callApi() async{
  print('Line 2 - Async Function callApi called');
  normalFunction2();
  print('==>A: Line 2 - Line 2 function callApi');
  final response = await http.get(Uri.parse('https://codesiri.com/search/?q=api'));
  print('==>A: Line 3 - call api done !');
  print('==>A: Line 4 - done !');
  return 'Done !';
}

void normalFunction1(){
  print('Line 4 - This is normalFunction1');
}
void normalFunction2(){
  print('==>A: Line 1 - This is normalFunction2');
}

Result:


I/flutter (21546): Line 1 - done !
I/flutter (21546): Line 2 - Async Function callApi called
I/flutter (21546): ==>A: Line 1 - This is normalFunction2
I/flutter (21546): ==>A: Line 2 - Line 2 function callApi
I/flutter (21546): Line 3 - done !
I/flutter (21546): Line 4 - This is normalFunction1
I/flutter (21546): Line 5 - done !
I/flutter (21546): ==>A: Line 3 - call api done !
I/flutter (21546): ==>A: Line 4 - done !

Dart is a single-threaded programming language

The reason Dart has to handle such complex asynchronous events is because it was designed to be a single-threaded language. By default our entire Flutter application runs on a single Dart thread. You will also still be able to create additional threads to actively handle parallel or background tasks, but then you will have to deal with the problems that arise.

Summary

When it encounters an async event, Dart will always push it to the bottom to wait for it to be processed. If there is await before the async call, all code that follows will also be pushed to the bottom to wait with it. Otherwise the next lines of code will still be treated as if nothing happened. Understanding how Dart's async works will help you optimize your application.

Friday 29 July 2022

[Flutter] Fix install error "cmdline-tools component is missing" and "Android license status"

Flutter on windows

Command line tools are very useful during android app development with Flutter. In some cases you may have difficulty installing it due to version incompatibility or conflicts with other software. After installing cmdline-tools you can continue to confirm the Android license.

Sample Flutter doctor analytic info:

C:\Users>flutter doctor
Doctor summary (to see all details, run flutter doctor -v):
[√] Flutter (Channel stable, 3.0.5, on Microsoft Windows [Version 10.0.19043.1826], locale en-US)
[!] Android toolchain - develop for Android devices (Android SDK version 33.0.0)
    X cmdline-tools component is missing
      Run `path/to/sdkmanager --install "cmdline-tools;latest"`
      See https://developer.android.com/studio/command-line for more details.
    X Android license status unknown.
      Run `flutter doctor --android-licenses` to accept the SDK licenses.
      See https://flutter.dev/docs/get-started/install/windows#android-setup for more details.
[√] Chrome - develop for the web
[X] Visual Studio - develop for Windows
    X Visual Studio not installed; this is necessary for Windows development.
      Download at https://visualstudio.microsoft.com/downloads/.
      Please install the "Desktop development with C++" workload, including all of its default components
[√] Android Studio (version 2021.2)
[√] VS Code (version 1.69.2)
[√] Connected device (3 available)
[√] HTTP Host Availability
! Doctor found issues in 2 categories.

As suggested, you just need to run the command: Run `path/to/sdkmanager --install "cmdline-tools;latest"`. But there might be an error: Exception in thread "main" java.lang.NoClassDefFoundError: javax/xml/bind/annotation/XmlSchema. In this case we can fix it by installing cmdline-tools through Android Studio. This method is always applicable and very easy to do.

Step 1: In the Android Studio software, you click on the menu Tools >> SDK Manager

Step 2: In the SDK Manager setting screen, select the "SDK Tools" tab. Then tick "Android SDK Command-line Tools (lastest)". Finally click "Apply" to start the installation.

Step 3: After installing "Command-line Tools" you can open a command line window to continue to confirm "Android licenses"

flutter doctor --android-licenses

Done ! Check Flutter doctor to make sure everything is fully installed. Good luck.


Tuesday 26 July 2022

[Laravel] How to find out which Class and File are behind a Facade

Facades in Laravel allow us to call libraries very conveniently. However, developers who are new to a project will find it difficult to investigate errors because Laravel Error Handling does not specify which class caused the error. In particular, the problem is very common with Facades that have many services  available. Ex: DB, Image, Auth, Cache, Mail...

Laravel Facade Flow

* Quick debug:

To find out the PHP class behind a Facade that you don't know where it is, you can debug it with the following code:
$behindClass = get_class(\<<Facade>>::getFacadeRoot());
$classReflector = new \ReflectionClass($behindClass);
dd($behindClass, $classReflector->getFileName(), $classReflector);
ex: 
$behindClass = get_class(\Mail::getFacadeRoot());
$classReflector = new \ReflectionClass($behindClass);
dd($behindClass, $classReflector->getFileName(), $classReflector);
result:

* Understand how the Facade is loaded by Laravel:

To find the underlying class behind a Laravel Facade without debugging you need to understand how a Facade is installed and loaded into Laravel.
Facade looks magical, but it's actually based on PHP's built-in class_alias feature. You can see in the project's config file (/config/app.php) there is a block to declare the Facade class alias.
Ex:
'aliases' => [
  ....
  'Lang' => Illuminate\Support\Facades\Lang::class,
  'Log' => Illuminate\Support\Facades\Log::class,
  'Mail' => Illuminate\Support\Facades\Mail::class,
If you open the class Illuminate\Support\Facades\Mail you will see that the class is almost completely empty. It has very little source code and doesn't really handle any features. In this file, the most special thing we see is the getFacadeAccessor() function and this function does not process anything but just returns a simple string like "mailer". This function is present in all Facades.
protected static function getFacadeAccessor()
{
         return 'mailer';
}
It looks magical, but it's not really here. Illuminate\Support\Facades\Mail inherits another class, Illuminate\Support\Facades\Facade::class . In this superclass Laravel will call getFacadeAccessor() to get the name of the actual service that has been configured by laravel for this facade. The example here is 'mailer'. Laravel will then call the 'mailer' service to return the Facade call - app('mailer').
You may be wondering that until now we still do not know where the 'mailer' service is located and how it is declared in Laravel.
Normally, every Laravel service needs to be declared through a Provider and then be available anywhere. Facades are treated the same way. Usually when you install a service pack from outside you will see in the source code of that service pack in addition to the Class Facade there will be a Class Provider to declare the service with Laravel. This means that once we have found information about Facade's extension in config/main.php, we can next look for Class Provider in that extension's source code to see the exact services that have been provided. How is it declared and what files it leads to.
Ex:
class MailServiceProvider extends ServiceProvider implements DeferrableProvider
{
    public function register()
    {
        $this->registerSwiftMailer();
        $this->registerIlluminateMailer();
        $this->registerMarkdownRenderer();
    }
    protected function registerIlluminateMailer()
    {
        $this->app->singleton('mailer', function ($app) {
            $config = $app->make('config')->get('mail');
Usually the Providers will be installed automatically when we add the extension package to the project. In addition, Providers can also be manually declared in "config/app.php". There are some services that are core of Laravel, so by default they are declared when laravel starts. For example, with the 'mailer' service we just learned about. For core services, the Facade location and the service source code may be different. As with most package that you install from a third party, the Facade source code, Facade Provider, and Facade-related files are all in the same place in Vendors.

* Note:

we can read the source code in the "vendor" to understand and find a way to fix the error faster, but it is absolutely not recommended to edit the source code directly in the "vendor".